Table of Contents
 This page in German (Seite auf Deutsch)
Please order via email: mail@webtemp.org
Software manual
CoolTWILED 3.x can be controlled with any standard browser. No additional software needs to be installed.
Downloads
Firmware updates
CoolTWILED is shipped with the latest firmware. It can be updated on the tab “Wireless / Firmware update”. If the version number does not change as a result of the update, all settings are retained.
In case the version number changes, the update triggers a reflash of the onboard microcontroller firmware (the display will blink during this process). Please note that this will reset all settings including the ones for the fans, but not the wireless network data, to default values. It is recommended to export/import the settings (please see the tab “Expert options”).
Ensures continued telemetry operation after the server migration.
Customizable second longitude to delay weather data depending on the position of the sun.
Fixes the weather service.
For software and firmware updates of other hardware versions, please see their respective sub pages.
Browser interface and the texts on the display are available in English and German language. If you are willing to provide other translations (also for the firmware), please email us.

Wireless network setup
Automatically via WPS
For initial setup, please press the WPS button on the router and then immediately switch on CoolTWILED's power supply.
When starting for the first time, no WiFi settings (SSID, password) are stored. Only in this case WPS will be tried.
If successful, the blue LED on the WiFi module will turn off after a few seconds and CoolTWILED can be accessed within the local network at http://cooltwiled.local.
Manual setup
If for some reason no WiFi connection can be established after power-on, the blue LED on the WiFi module lights up continuously after a few seconds and CoolTWILED opens its own WiFi for manual setup, called CoolTWILED, with the password Coolhardware.de
Once you have connected to it, access is possible via the address http://192.168.4.1. Manual setup can then be performed on the “WiFi” tab.
By clicking the respective button, the stored WiFi settings can also be deleted. Only then CoolTWILED will try WPS to establish a new connection (see above).
Reset to factory defaults
To reset all settings to factory defaults, please switch off your power supply first. At the Link port, plug the jumper into position JMP. Do not put the jumper into positions other than the described one. If the power is turned back on, the display backlight should be flashing (with no text) for a few seconds. Normal booting follows and the jumper needs to be removed. After that, all settings will be reset to their defaults and wireless setup can be done like described above.

Save settings permanently
Once every setting has been adjusted to your needs, you can click “Save” to save the whole configuration to a nonvolatile memory. Only then the settings can be restored after a power loss. The coin cell backed real time clock will make sure the clock runs all the time.
Pair an IR remote control (optional)
For this, an IR remote control capable of the RC-5 standard is needed (please refer to its manual and choose an appropriate device code).
Pairing can be started by clicking “Pair”. While pairing you will be requested (see the display) to press various keys. Finally all settings will be permanently saved.
You can abort the sequence by clicking “Pair” a second time.
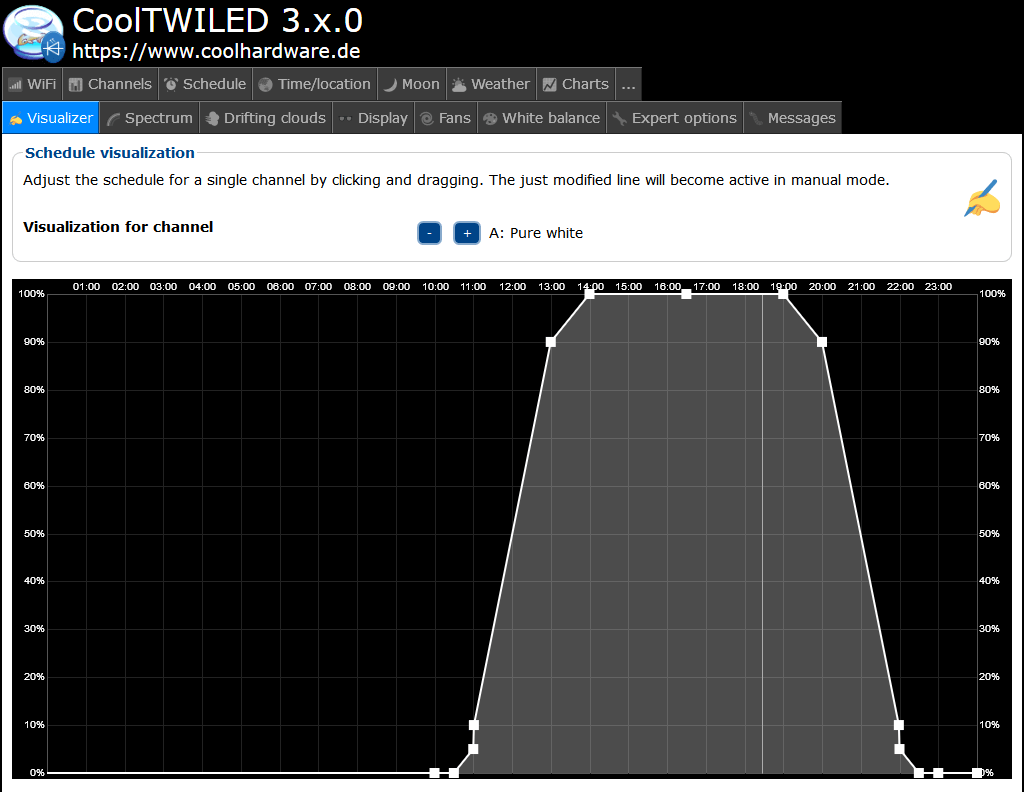
Define mode and light schedule
Modes control how the light schedule is processed. Mode can be changed on the tab “Channels”.
Manual
In this mode the channel brightnesses can be manually controlled using the tab “Channels”.
Via an IR remote control you can edit the lines of the schedule: Press “Right” or “Left” to choose channel A-L or time/alt. Then use “Up” or “Down” to adjust the corresponding value. To switch between the lines press “Next” or “Previous”.
Also on this tab you can assign a label (color) to each channel. There are 15 pre-defined colors available. Changing them will only change the text, so these assignments exist for the sake of clarity and do not affect the light control schedule.

Auto
In this mode, the sequence is determined by exact time. Explanation based on the default schedule (excerpt):
Line   Time Channel A ... G ... I ... K
   0  10:00        0%    0%    0%    0%
   1  10:30        0%    0%   60%  100%
   2  11:00        5%    0%  100%  100%
   3  11:01       10%  100%   10%    0%
   4  13:00       90%  100%   60%    0%
   5  14:00      100%  100%   60%   50%
   6  16:30      100%  100%   60%   50%
   7  19:00      100%  100%   60%   50%
   8  20:00       90%  100%   60%    0%
   9  21:59       10%  100%   10%    0%
  10  22:00        5%    0%  100%  100%
  11  22:30        0%    0%   60%  100%
  12  22:55        0%    0%    0%    0%
  13  23:00        0%    0%    0%    0%
  14  24:00        0%    0%    0%    0%
  15  24:00        0%    0%    0%    0%
 ...
The times have to be in 24 hour format. 00:00 = begin of the day, 24:00 = end of the day.
Brightnesses have to be specified in percent and can be accurate to 1/4096. The values will be rounded accordingly.
Each line determines the brightnesses of all the channels at a given time. Intermediate steps are calculated every 10 milliseconds, so that all the transitions happen very smoothly and continuously. For example at 13:30 the channels are calculated to be at 95%, 100%, 60%, 25%.
Important limitation: Time must not be decreasing from one line to the next. Only this makes sure that brightnesses are defined for the whole day.

Geo
This mode is similar to the Auto mode. However, light is controlled not by time, but by sun altitude (in degrees above horizon, 0° = sunrise, sunset; 90° = sun at the zenith, which only happens in the tropics). Sun altitude is calculated based on date, time and geographic location. These values can be configured on the tab “Location & time”. Just like in Auto mode intermediate steps are calculated smoothly.
Example:
Line   Alt  Channel A
   0    0°         0%
   1   90°       100%
   2    0°         0%
   3  -90°         0%
The LEDs will start at 0% at sunrise (0°). When the sun is at the zenith (90°), they reach 100%. Until sunset (0°) brightness decreases. It then is at 0% again. If the sun cannot be at the zenith due to season or location, 100% brightness cannot be achieved. The correct way to circumvent this is as follows:
Line   Alt  Channel A
   0    0°         0%
   1   30°       100%
   2   90°       100%
   3   30°       100%
   4    0°         0%
   5  -90°         0%
Now, maximum brightness will be reached at 30° altitude and stays there until the sun falls below 30° in the evening.
Important limitation: There have to be lines for 90° as well as -90°. Again, to make sure valid brightnesses are defined for every possible altitude.
Geographic location should be chosen according to the aquarium dwellers so that they can experience natural variability in length of daylight. Many flowering plants use this for orientation. Corals will most probably do the same, but they are also aware of moon phases.
Two tips: Play with longitude, to move the simulated daylight to an earlier/later point in time. This has to influence on seasonal variations. Toggle the sign of latitude (positive/negative) to mirror the seasons: This way to can achieve summer conditions when it is summer time where you live (= later twilight), even though your aquarium dwellers actually originate from the other hemisphere.
RGB demo
Flash
These are modes for demonstration purposes.
Time lapse
In order to check the settings or for demonstration purposes, Auto and Geo modes can be run in fast motion. Also clouds and thunderstorms will be accelerated. Factor 72 will make the clock tick 72 times as fast, which results in a “length of day” of 24*60/72 = 20 minutes. Default value is 1 (real-time). Entering 0 will stop the clock entirely.

Weather
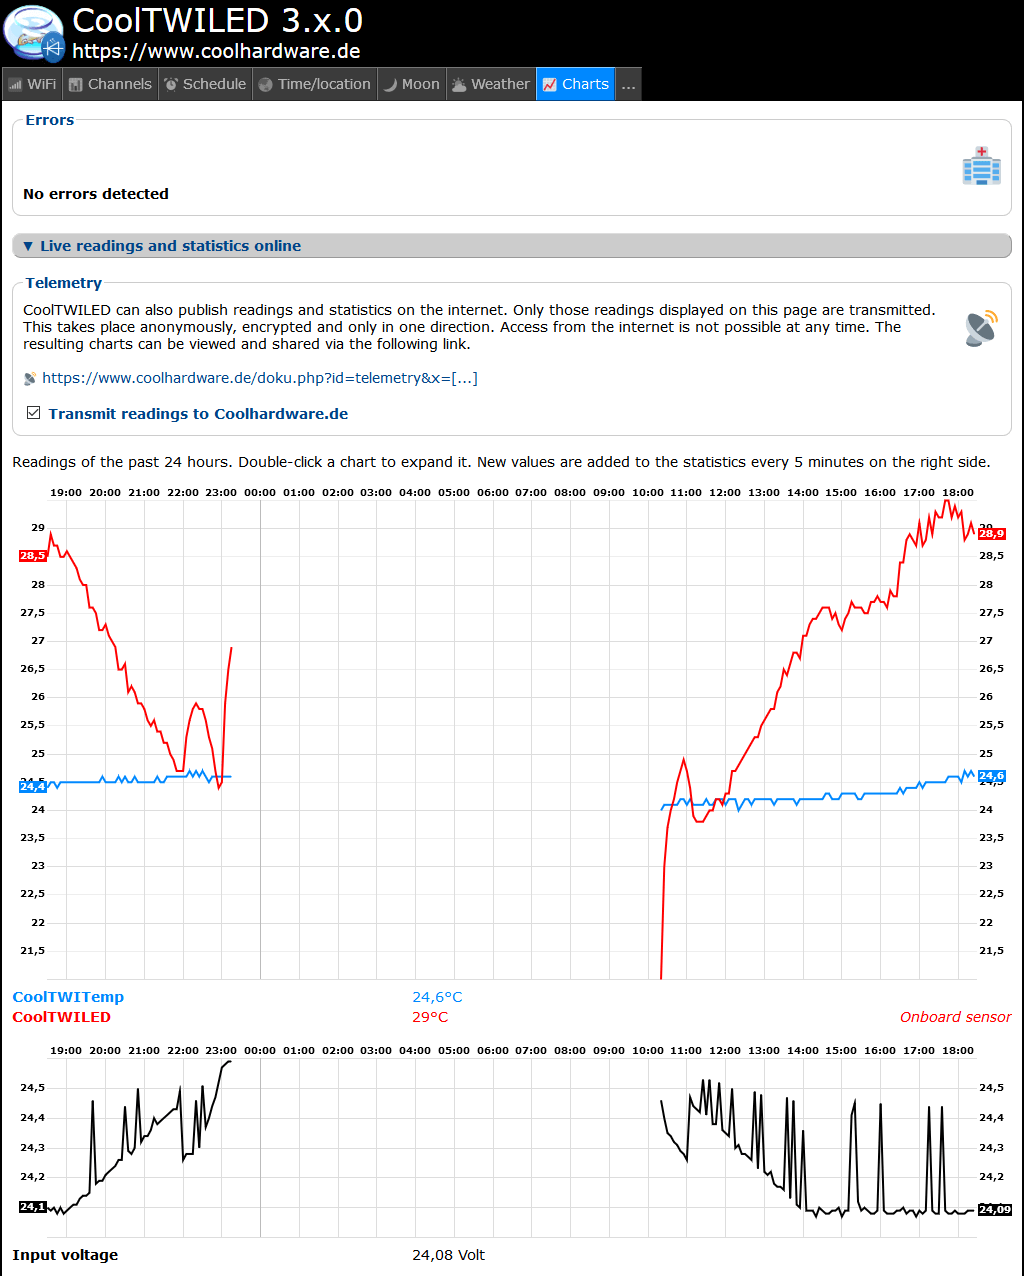
Clouds and (optionally) thunderstorms can be simulated. In both cases the brightness of all outputs is decreased and later increased, both at a random point in time. During a thunderstorm lightning is simulated by switching outputs to 100% for a very short amount of time. The frequency and dimming speeds of these events along with their duration and dimming level can be adjusted in the tab “Weather”.
During a cloud an “O” appears on the top right of the display. During a thunderstorm an “S” is displayed.
Drifting clouds
To simulate drifting clouds you can define different delays for every channel. Clouds and also thunderstorms will only affect the channels after the entered time has passed.
If you build your lamp so that the leftmost LEDs are connected to channel A and the rightmost ones to channel F, by entering increasing values the clouds then will move from left to right.

Moon brightness
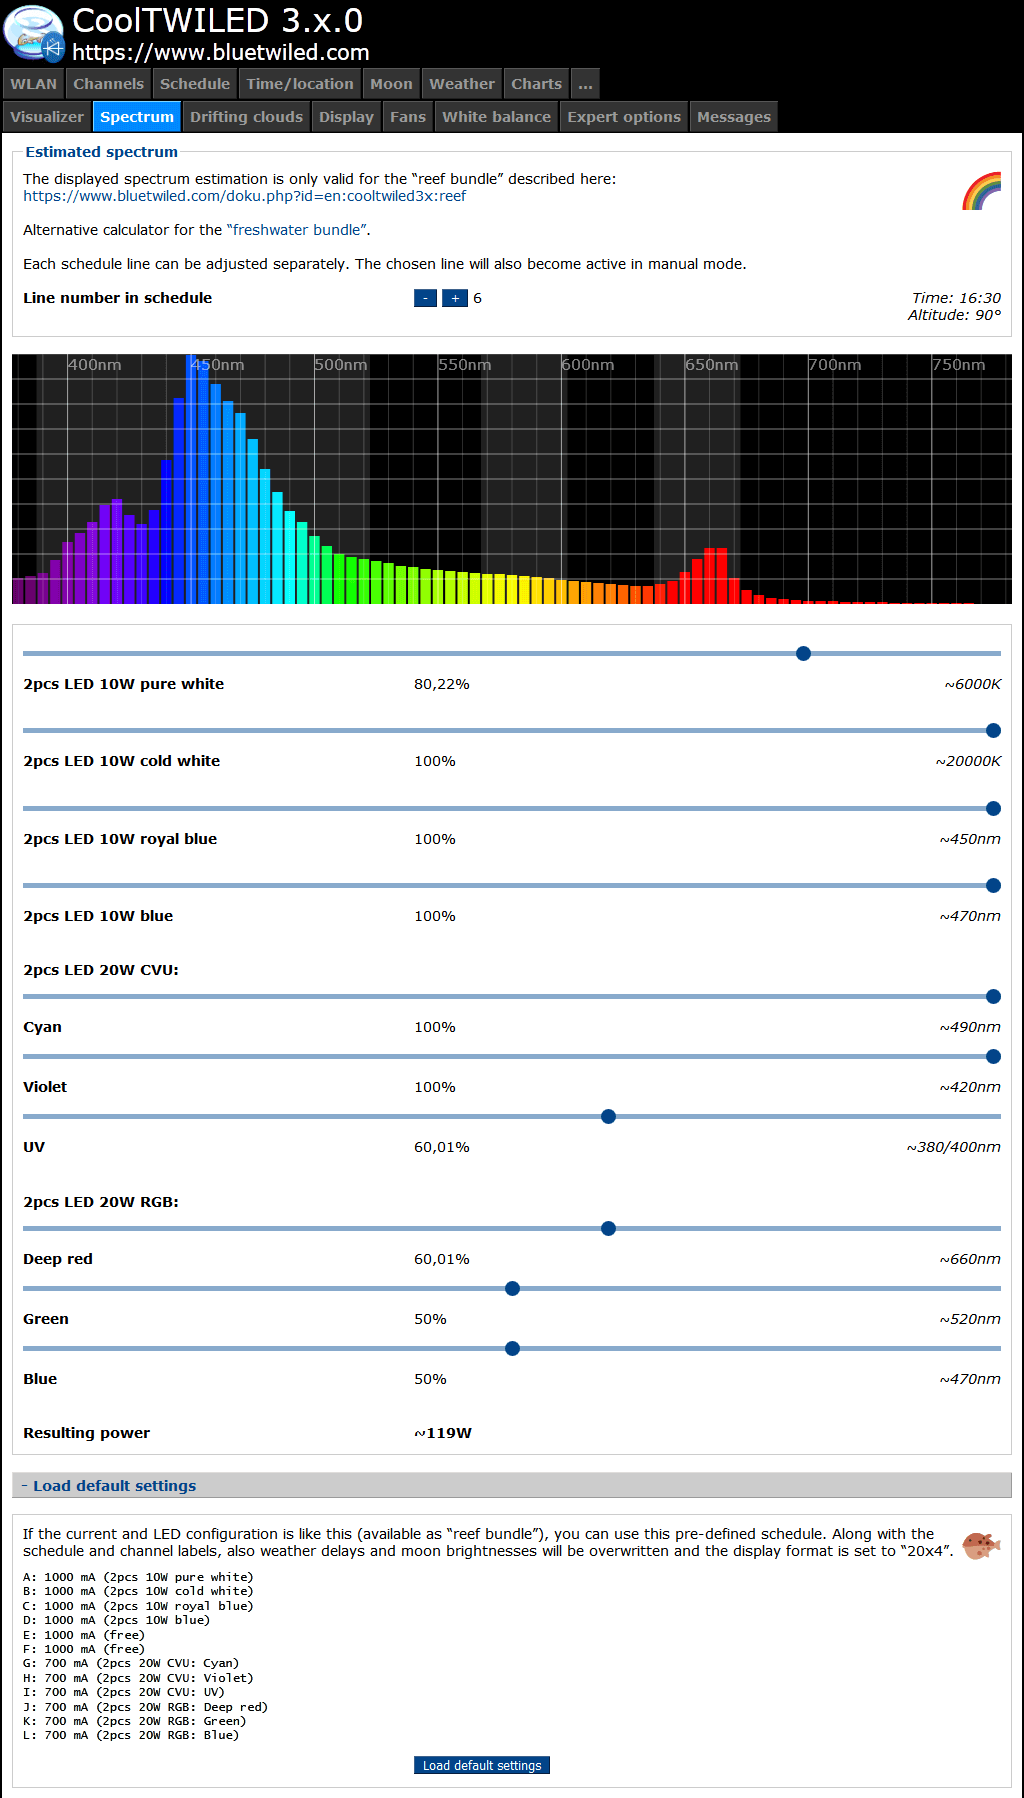
In order simulate moon phases, the channels have to be configured accordingly. On this tab you can enter the maximum moon brightness (which will occur when full moon is in the zenith). CoolTWILED adds proportionally calculated values (depending on the actual moon altitude and phase, which are determined by date, time and location) to the current brightness levels (only in “Auto” and “Geo” modes).
The moon will be below horizon for half a day. It cannot be observed then. This period is shifted by about one hour from day to day. If the moon is above the horizon during day, it has no effect either, since it is outshone by the sun (also, this happens around new moon).
Waxing moon then is visible during the first half of the night. Full moon rises on sun set and is visible the whole night (with increasing brightness). Waning moon will shine during the second half of the night.
If you would like to achieve a constant night light (every night and independent of the phase of the moon), you can instead enter the desired brightnesses in the schedule.
Development of moon phase (red) and relative moon brightness (blue) over the course of one month:


Display background brightness
The value next to “Bright level” determines the display background brightness after a write access has occurred.
Otherwise the display background brightness will be in “Dim level”.
You can switch the illumination off at night to make the room completely dark. For this, go to “Schedule” and uncheck “Display” at those times you want the display to be dark.

Fan speed
Two fans can be connected to the board for LED cooling. Please use identical fans, since they will be connected in series. Fan speed is automatically chosen depending on the LED brightness (= power). When LEDs are off (and below a certain brightness) the fans rest. Above that they are at the “Slow level”. With increasing brightness speed also increases until it hits the “Fast level”, which is the maximum fan speed. All levels can be controlled on this tab. Please note that same values will have different effects on different fan models. While one model is still resting at a certain speed setting, another model might already run audible. A bit of experimenting will help.
After connecting CoolTWITemp 1.x (temperature sensor) more fan modes are available, which controls fan speed by temperature. The fans will be switched on at an upper start temperature and off at a lower stop temperature (hysteresis). These modes are recommended for cooling the aquarium water.
If one (or more) SlavePlus boards are connected, there is an option to cool LEDs and water independently.

 05:30:19 up 308 days, 23:33, 0 users, load average: 11.88, 9.68, 8.89