Table of Contents

 This page in German (Seite auf Deutsch)
ElecPow 1.x
 ElecPow is a free alternative firmware for various ESP8266-based WiFi power meters and offers the following functions:
- No need to use any cloud service. Platform-independent access using standard browsers within the local network.
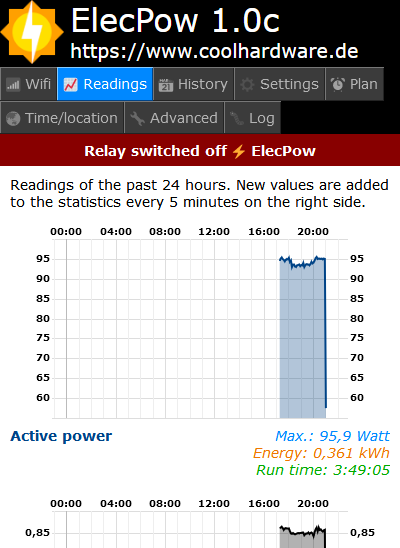
- Measurement and display of the current mains voltage, current and active power,
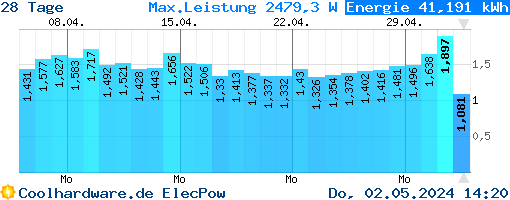
- the maximum daily value of active power and in total, and
- the accumulated daily energy and in total.
- Only locally accessible web server: recording and graphic rendering of the data of the last 24 hours.
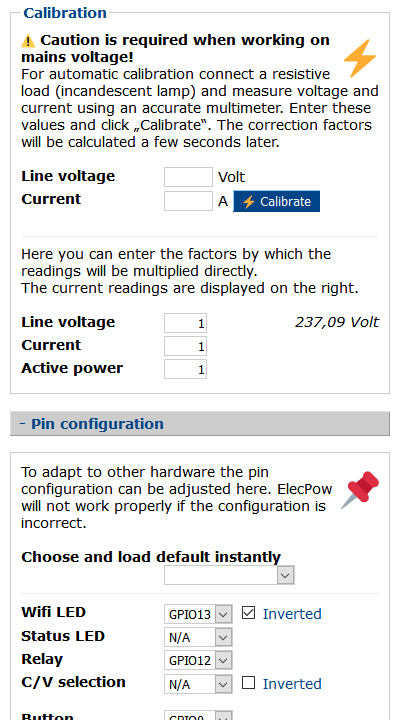
- Calculation and indication of the apparent and reactive powers as well as the power factor.
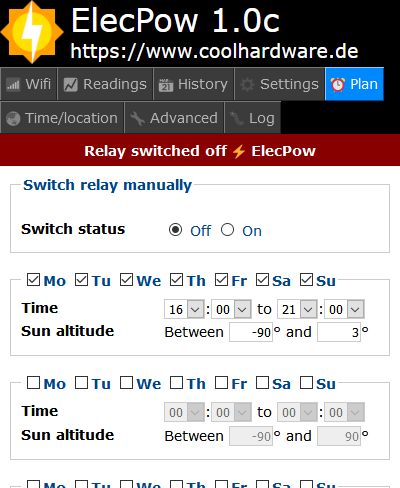
- Timer: Programmable switching of the relay depending on the time and/or calculated sun altitude above the horizon.
- Automatic changeover to daylight savings/standard time.
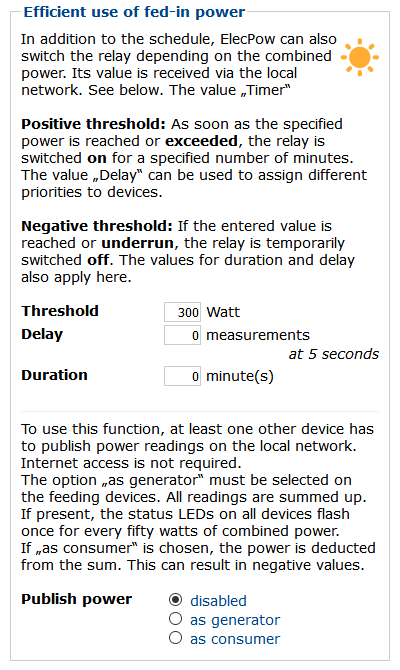
- Switching of sockets or signalling by LED depending on the power supplied by other sockets.
- Free configuration of the pins for e.g. relay, key, WiFi and status LED. Presets for known hardware are also available.
- A BME280 or BME680 can be connected to free pins of the microcontroller. Attention: Cable and sensor must NOT leave the plastic housing (mains voltage)!!!
No Internet connection is required for the basic functions. However, it is recommended so that the current time can be fetched via NTP at startup.
Examples
In addition, it is also possible to transfer the readings anonymously to a database on our server (location: Germany) and to have charts generated there. We will gladly activate this function for a small one-time fee, which covers our server costs. You can activate data logging at the top of the “Readings” tab.


Remote access from the Internet to the device is not possible at any time, i.e. no switching off or altering of any settings.
Download
Each archive contains the firmware as a full image (1MB) and variants for flashing over Tasmota (512kB). The flash tool esptool and a batch file to control a serial adapter.
Once installed, later updates of the firmware can easily be done via the tab “WiFi / Firmware update”. Use the large image there.
Initial Installation
From within Tasmota
The archive contains all files needed in the subfolder “tasmota”.
- If Tasmota is accessible via browser within the WiFi: Select “Firmware Upgrade”.
- Otherwise: Connect to the WiFi “tasmota-XXXXXX-YYYY”, then go to http://192.168.4.1/up
- “Upgrade by file upload”, “Browse…”, then select “tasmota-minimal.bin.gz”, “Start upgrade”.
- After the automatic reboot, go to the “Firmware Upgrade” page again.
- “Upgrade by file upload”, “Browse…”, then select the file for the corresponding hardware, e.g. “ATHOM_PG01V2-512k.bin”, “Start upgrade”.
Using a serial adapter
Never operate the power meter with its case open! Do not connect any programming cables while the device is connected to mains power!!!
A serial adapter is required (e.g. “FTDI USB to TTL serial adapter”). The above download includes all needed files.
Examples of the procedure for two selected models:
Sonoff Pow R2
- IMPORTANT: Disconnect the device from mains power!!
- Open the case,
- connect the serial adapter to the device (3.3 Volt, RX, TX and GND), but not yet to the PC,
- start the batch file ElecPow.bat.
Create a backup:
- Press and hold the button on the Sonoff Pow R2 during the next steps,
- connect the serial adapter to the PC,
- press “b” on the PC,
- once the process is complete, release the button on the Sonoff Pow R2,
- disconnect the serial adapter from the PC.
Install ElecPow:
- Press and hold the button on the Sonoff Pow R2 during the next steps,
- connect the serial adapter to the PC,
- press “1” on the PC,
- once the process is complete, release the button on the Sonoff Pow R2,
- disconnect the serial adapter from the PC,
- close the case.


If you are using Linux instead of Windows, execute the following commands after installing esptool. Before each step, press and hold the button on the device and then reconnect the serial adapter to the PC. This is necessary for the chip to start in programming mode:
Create a backup:
esptool read_flash 0 0x400000 backup.bin
Install ElecPow:
esptool write_flash 0 SONOFF_POW_R2.bin
Finally, we would like to emphasize that the device must not be connected to mains power with the case open and/or with programming cables connected!!!
Gosund SP1 v2.3+
- IMPORTANT: Disconnect the device from mains power!!!
- Open the case and carefully remove the board from the mounting brackets,
- carefully solder a bridge between IO0 and GND,
- solder the serial adapter to the board (3.3 Volt, RX, TX and GND), but do not yet connect it to the PC,
- start the batch file ElecPow.bat.
Create a backup:
- Connect the serial adapter to the PC,
- press “b” on the PC,
- after the process is completed, disconnect the serial adapter from the PC.
Install ElecPow:
- Connect the serial adapter to the PC,
- press “4” on the PC,
- after the process is completed, disconnect the serial adapter from the PC,
- carefully remove all the soldered connections,
- re-attach the board,
- close the case.


If you are using Linux instead of Windows, execute the following commands after installing esptool. The serial adapter must be reconnected to the PC before each step. This is necessary so that the chip starts in programming mode:
Create a backup:
esptool read_flash 0 0x100000 backup.bin
Install ElecPow:
esptool write_flash 0 GOSUND_SP1_V23.bin
Finally, we would like to emphasize that the device must not be connected to mains power with the case open and/or with programming cables connected!!!
Software manual
WiFi setup
As long as WiFi is not yet set up, ElecPow will, via WPS, search for an access point during the first few seconds after power on (press the WPS button on your router prior to connecting the device to mains power).
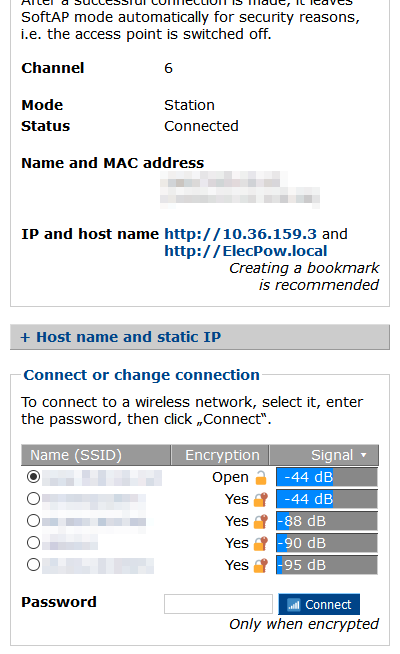
If WPS does not work, ElecPow itself opens an access point named ElecPow and the password Coolhardware.de The blue LED will then light up permanently. After connecting to this WiFi, access is possible via the address http://192.168.4.1. On the “WiFi” tab an existing network can then be selected and its password entered manually.
The blue LED will turn off once WiFi has been set up correctly. The device then can be accessed there (locally) by browsing to http://elecpow.local.
Reset to default settings
To force a reset to default settings, press and hold the button on the powered up device for about 5 seconds. Subsequently, all settings including the WiFi data are erased. You can set up the device again the same way as described above.
More screenshots


 05:28:36 up 309 days, 23:31, 0 users, load average: 9.01, 9.94, 10.23